vulcanJS를 학습하면서 알아낸 점을 기록하는 의미의 튜토리얼을 써본다.
Telescope도 그랬지만 forum 형태의 예제에서 embedly를 사용하는 URL 요소가 글에 들어가는 점이나 일반인들에게는 익숙하지 않은 Markdown 문법 등을 걷어내고 최소형태에서부터 접근해야할 필요성을 느껴서 단순 post만 목록 열람하고 읽고 쓰는 구현을 해보기로 했다.
먼저, vulcanJS를 github를 통해 clone 하고 meteor create --package를 통해 만들수도 있지만 Vulcan-Cli(https://github.com/VulcanJS/vulcanjs-cli)가 있어서 이걸 일단 사용해보기로 한다.
대충 내용을 읽어보니 Rails 생각이 나기도 하고 재밌어 보인다.
npm 에 global로 설치한 첫번째 경우 기준으로 진행해보겠다.
설치하고 난 뒤 vulcan 을 실행해보면
생성해보면 실제로 project/package/model/component/route는
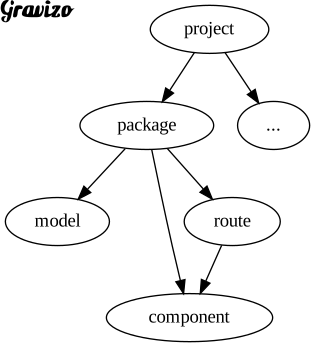
위와 같은 관계를 가진다.
Project는 vulcanjs를 clone한 전체이며 우리가 실제로 개발하는 것은 package이다.
이정도로 일단 머릿속에 그림을 그려두고 project를 만들어 보자.
이름은 simplebb이라고 하자.

Telescope도 그랬지만 forum 형태의 예제에서 embedly를 사용하는 URL 요소가 글에 들어가는 점이나 일반인들에게는 익숙하지 않은 Markdown 문법 등을 걷어내고 최소형태에서부터 접근해야할 필요성을 느껴서 단순 post만 목록 열람하고 읽고 쓰는 구현을 해보기로 했다.
먼저, vulcanJS를 github를 통해 clone 하고 meteor create --package를 통해 만들수도 있지만 Vulcan-Cli(https://github.com/VulcanJS/vulcanjs-cli)가 있어서 이걸 일단 사용해보기로 한다.
대충 내용을 읽어보니 Rails 생각이 나기도 하고 재밌어 보인다.
npm install -g vulcanjs-cli혹은 meteor 에서만 한다면
meteor npm install -g vulcanjs-cli이런 식으로 설치하고 쓰면 된다.
npm 에 global로 설치한 첫번째 경우 기준으로 진행해보겠다.
설치하고 난 뒤 vulcan 을 실행해보면
$ vulcan이와 같이 용례가 나온다.
vulcan usage:
Synopsis
vulcan <action> <object> <...>
<action> Operation to perform
<object> Asset type (contextual to action)
<...> Parameters. If not provided, interactively entered
Project initialisation
vulcan create <appName>
vulcan init <appName>
Assets creation
vulcan (generate|g) package <packageName>
vulcan (generate|g) model <packageName> <modelName>
vulcan (generate|g) component <packageName> <modelName> <componentName>
vulcan (generate|g) route <packageName> <routeName> <routePath>
Assets removal
vulcan (remove|r) package
vulcan (remove|r) model
Assets listing
vulcan (list|l) routes
vulcan (list|l) packages
생성해보면 실제로 project/package/model/component/route는
위와 같은 관계를 가진다.
Project는 vulcanjs를 clone한 전체이며 우리가 실제로 개발하는 것은 package이다.
이정도로 일단 머릿속에 그림을 그려두고 project를 만들어 보자.
이름은 simplebb이라고 하자.
$ vulcan create simplebb
패키지 관리자를 뭘 쓸거냐고 묻는다. npm v5가 아직 안정화 문제가 있어 조금 빠른 yarn을 선택했다.
? App name simplebb
? Package manager yarn
Pulling the most up to date git repository...
Cloning into 'simplebb'...
remote: Counting objects: 62381, done.
remote: Compressing objects: 100% (17/17), done.
remote: Total 62381 (delta 5), reused 15 (delta 4), pack-reused 62359
Receiving objects: 100% (62381/62381), 10.48 MiB | 717.00 KiB/s, done.
Resolving deltas: 100% (41391/41391), done.
I'm all done. Running yarn install for you to install the required dependencies. If this fails, try running the command yourself.
yarn install v0.27.5
[1/4] Resolving packages...
[2/4] Fetching packages...
[3/4] Linking dependencies...
warning "optics-agent@1.0.5" has incorrect peer dependency "graphql@^0.6.2 || ^0.7.0 || ^0.8.0".
warning "graphql-tools@0.8.4" has incorrect peer dependency "graphql@^0.5.0 || ^0.6.0 || ^0.7.0 || ^0.8.0".
[4/4] Building fresh packages...
Done in 26.77s.
Successfully generated vulcan code base.
To run your new app:
cd simplebb
yarn start
알아서 뭔가 척척 한다.
보니까 그냥 단지 github에서 vulcanjs를 clone 한것으로 보인다.
$ git remote --verbose
origin https://github.com/Vulcanjs/Vulcan (fetch)
origin https://github.com/Vulcanjs/Vulcan (push)
역시 그러하다.
React와 버전 문제도 있고 vulcanJS는 현재도 개발 중인 project이므로 버그와 legacy 코드가 남아있는 Master branch를 쓸 필요 없다.
devel branch를 쓰자.
$ git fetch
$ git checkout devel
git checkout devel
Branch devel set up to track remote branch devel from origin.
Switched to a new branch 'devel'
devel branch로 옮기고 난 걸 확인하고 최초 실행을 한번 해보자.
$ yarn start
yarn start v0.27.5
$ sh prestart_vulcan.sh
🛠 Creating your own settings.json file...
🌋 Happy hacking with Vulcan!
📖 The docs are available at: http://docs.vulcanjs.org
$ meteor --settings settings.json
[[[[[ ~/Documents/js/meteor/vulcanjs/simplebb ]]]]]
=> Started proxy.
=> Started MongoDB.
W20170828-17:31:37.151(9)? (STDERR) Warning: Accessing PropTypes via the main React package is deprecated, and will be removed in React v16.0. Use the latest available v15.* prop-types package from npm instead. For info on usage, compatibility, migration and more, see https://fb.me/prop-types-docs
W20170828-17:31:37.384(9)? (STDERR) Warning: Accessing createClass via the main React package is deprecated, and will be removed in React v16.0. Use a plain JavaScript class instead. If you're not yet ready to migrate, create-react-class v15.* is available on npm as a temporary, drop-in replacement. For more info see https://fb.me/react-create-class
W20170828-17:31:38.120(9)? (STDERR) Note: you are using a pure-JavaScript implementation of bcrypt.
W20170828-17:31:38.122(9)? (STDERR) While this implementation will work correctly, it is known to be
W20170828-17:31:38.123(9)? (STDERR) approximately three times slower than the native implementation.
W20170828-17:31:38.124(9)? (STDERR) In order to use the native implementation instead, run
W20170828-17:31:38.124(9)? (STDERR)
W20170828-17:31:38.125(9)? (STDERR) meteor npm install --save bcrypt
W20170828-17:31:38.126(9)? (STDERR)
W20170828-17:31:38.126(9)? (STDERR) in the root directory of your application.
I20170828-17:31:39.968(9)? // inserting dummy users…
I20170828-17:31:39.997(9)? // creating dummy movies
=> Started your app.
=> App running at: http://localhost:3000/
STDERR에 몇몇 경고가 보이지만 별거 없다. 그냥 넘어가자.
PropTypes이 React 패키지에서 PropType 패키지로 바뀌었는데 아직 수정이 안되었나보다. SachaG가 알고 있으니 조만간 수정될 것이다.
bcrypt는 성능상 native 구현을 권하는데 지금은 일단 상관없다.
http://localhost:3000을 한번 보자.

위와 같이 나온다면 이상없는 것이다.
다음엔 패키지 만들고 개발 준비를 마쳐보자.
댓글
댓글 쓰기